Make an Inexpensive DIY Waterproof Picnic Blanket Tote!
Monday, May 14, 2018This is sponsored by Acorn, all opinions are my own.
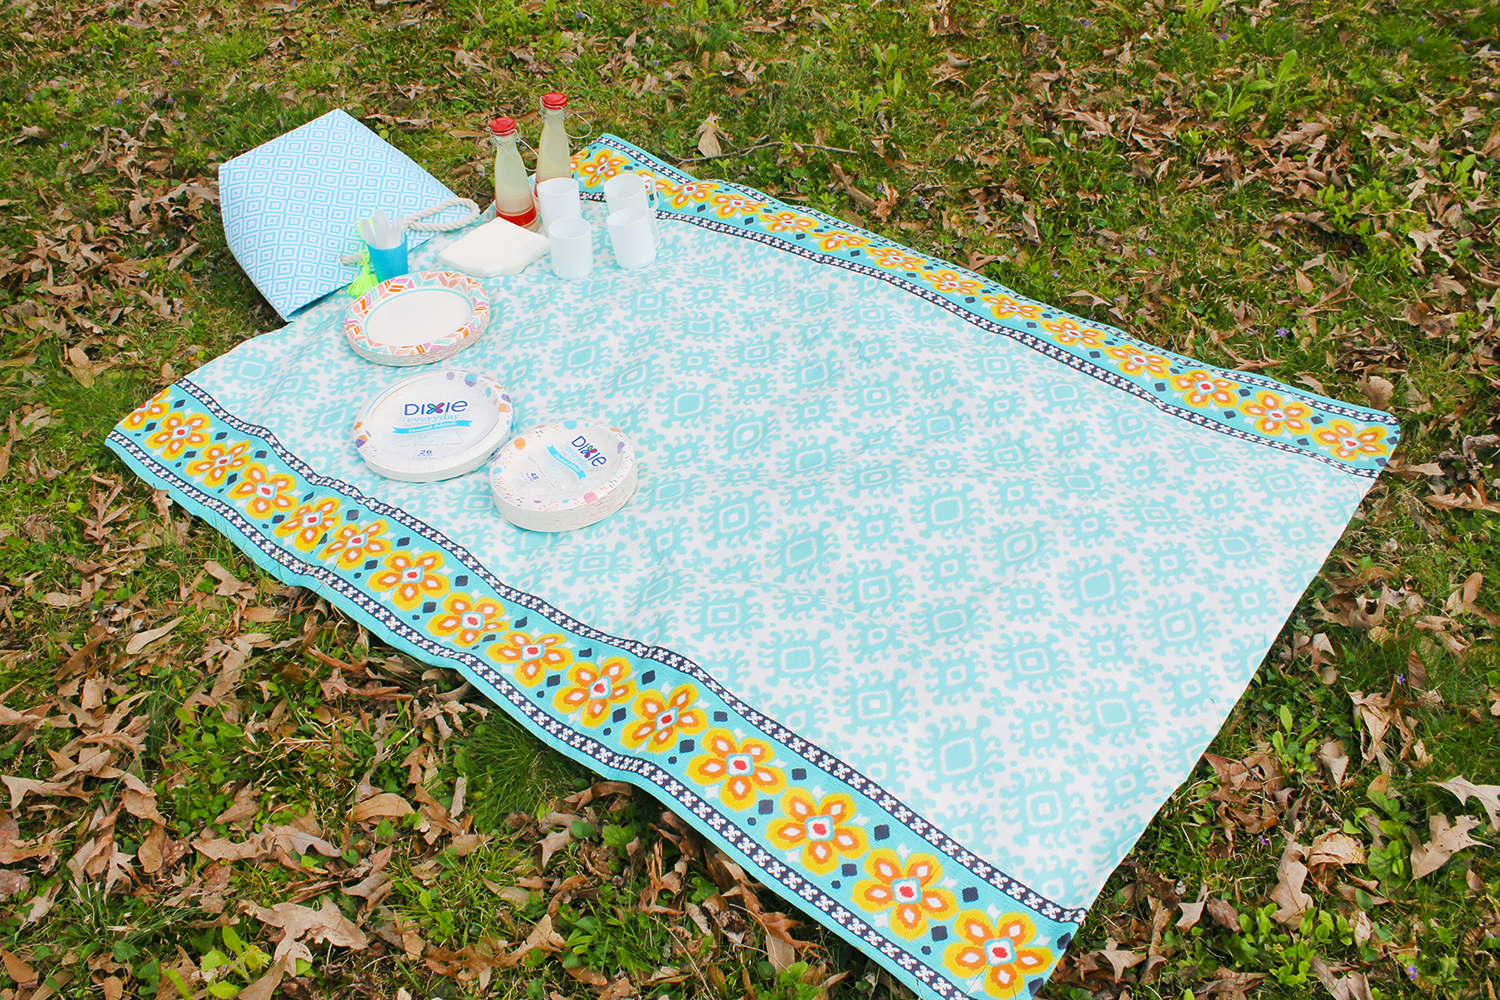

This picnic tote has the blanket attached so you can just fold it out for a place to sit anywhere and packing it back up is a snap. It's not only great for picnics but also the kids' outdoor games or movies in the park during the summer.

It's waterproof on both sides so you don't have to worry about wet grass or spilled drinks and the tote has enough room to hold lots of extras. The blanket inside will cushion the contents, too.


It's also super inexpensive to make (seriously!) I went to Dollar General to pick up all of the supplies for this cute picnic blanket tote and I got my picnic supplies there, too.

I grabbed these Dixie® plates in various sizes not just for the cute new exclusive designs, but because no matter what we're having, they can handle it. They've got 5 layers and are 50% stronger than the leading store brand, so you don't have to double up plates. Seriously- the Soak Proof Shield™ can handle anything from salad dressing to burger grease.

They're also good to have around the house on those days that I don't want to do another load of dishes. They're cut-resistant and microwavable, so they're perfect for reheating leftovers.

Affordable? Yes. You can get new Dixie designs through the end of July at Dollar General. Look for them right in the seasonal aisle. I grabbed the Dixie® Everyday 26 ct. 10.5-inch Plates, the Dixie® Everyday 48 ct. 9-inch Plates, and the Dixie Ultra® 20 ct. 10.5-inch Plates so I'm ready for anything!

While you're in the seasonal aisle, look for these pretty vinyl felt-backed tablecloths. You'll need 2 matching or coordinating designs for this picnic blanket tote (make sure they're both the same size and shape!)

Grab a matching tote bag a few aisles over and you're all set. This picnic blanket tote only cost me a grand total of $13 + tax to make!!!

You'll also need a hot glue gun and some clips, like clothespins or binder clips. Let's DIY it!

DIY Waterproof Picnic Blanket Tote
Supplies:
- 2-Vinyl tablecloths with felt backing (I'm using 52"x70" rectangles)
- large tote bag
- hot glue gun + extra glue sticks
- 6 large clips
Directions:
1. Unfold and lay the first tablecloth on a large surface like a floor, felt-side-up. Unfold and lay the second tablecloth felt-side-down on top of it. Match up the edges and clip at each corner. Don't worry if the edges don't match up exactly. We'll fix that later, just get it as squared up as you can.

2. Place a clip on both sides of the center of the long edges. Unclip 2 corners on one side and carefully pull the top layer back. Apply hot glue starting near the center, smoothing the top layer back in place as you go. Repeat on the opposite side.

3. Now that your tablecloths are glued together for the most part, you want to secure the edges to each other. Run a bead of glue right at the edge and press the two edges together. Do this all around all four edges and corners.

4. Now we're going to hide any imperfections at the edges. Place your blanket so that the side that has the overlap is on the bottom (so that it gets folded up and hidden in the next step.)

5. Run a bead of hot glue around the edges again and fold the edge up about an inch. Press in place.

When you get to a corner, run your glue around and then pull the edge up in folds. Press in place.

6. Now that your waterproof blanket is finished, let's adhere it to the tote. Fold the blanket in half on a short edge to find the center and mark it with a clip. Match it up to the center of the inside of the tote, run a bead of glue, and press it in place. Allow the glue to cool completely before moving it around.

Since the tote is so large, it's super-easy to fold up and store, leaving plenty of room for your picnic supplies.

Add paper plates, plastic cutlery, paper napkins, and cups to the tote and you'll be ready for any picnicking occasion!

I hope you enjoy this DIY and it helps you get out and have fun this summer!


PIN ME:

Do you like to picnic? Will you be making this picnic tote kit? I love to read your comments!


0 comments