Make Sushi at Home! {Recipes, Tips, and Techniques}
Saturday, January 17, 2015This post contains affiliate links.
If you like sushi as much as we do, but never thought you could make anything resembling restaurant sushi at home, this post is for you! I'll share recipes, tips, and techniques that will help you pull it all together with a professional polish!
What you'll need for any sushi rolls are sushi rice (specifically "sushi", not white rice), and Nori sheets. Then you'll need Soy Sauce (low sodium for dipping sushi), pickled ginger, and Wasabi for serving.
I was able to pick up a few things where we live but had to order the Nori and pickled ginger online. If you have the same small-city difficulties I do, you can do a quick search on Amazon to find just what you need. You'll also need Rice vinegar, vegetable oil, sugar, and salt for the sushi rice or buy a bottle of Japanese seasoned rice vinegar while you're on Amazon.
I was sent the SushiQuick sushi making kit to try out, and it worked really well. I'll tell you all about it and show you how it works.
The SushiQuick kit comes with a sturdy rolling mat, a base, a frame to help you place the rice, a cutting guide, a non-stick rice paddle, and the end caps for the rolling mat can be used to hold ingredients while you roll or hold your condiments for dipping.
There are a few things you need to prepare before you get started rolling.
First, the sushi rice. There is a great recipe on the SushiQuick box, or you can follow the recipe on your rice package. Remember to first rinse your rice until the water runs clear, and to add in your seasoning vinegar afterward. Cover the rice with a damp cloth or plastic wrap because you do not want it drying out!
You'll also want to prepare your filling ingredients.
 |
| Hey, buddy! What're we having for dinner tonight?! |
I'm using avocado, cucumber, shrimp, crawfish, and crab sticks along with Panko (to bring the crunchy), and some toasted sesame seeds to coat an inside-out roll. The shrimp and crawfish are boiled in a spicy crab boil (I use Zatarain's) because that's how we roll (sushi). Womp, womp, womp.
Just cut the ingredients into long sticks and you're good to go! Use your imagination; You can make any kind of sushi your little heart desires!
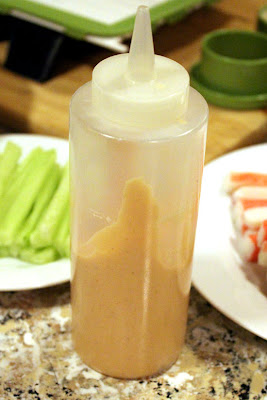
If you figured out we're big on spicy, and you are too, the first recipe is for that spicy orange sauce they put on top of your sushi. You know the stuff! It's easy to make, and you'll love it on any kind of spicy sushi!
Yield: 24

Spicy Japanese Sushi Mayo
If you figured out we're big on spicy, and you are too, the first recipe is for that spicy orange sauce they put on top of your sushi. You know the stuff! It's easy to make, and you'll love it on any kind of spicy sushi!
ingredients:
- 1 cup mayo (you can use Japanese Mayo if you can get it)
- 1 Tbsp. Roasted Sesame Oil
- 1 Tbsp. Sriracha Hot Sauce
instructions:
How to cook Spicy Japanese Sushi Mayo
- Whisk all ingredients together and you're all done! You can taste and add more hot sauce if you like it super-spicy.
- Put into a plastic squeeze container, or if you don't have one handy, you can use a ziploc bag with the tiniest bit of a corner cut off.
Calories
68.10
68.10
Fat (grams)
7.44
7.44
Sat. Fat (grams)
1.15
1.15
Carbs (grams)
0.21
0.21
Fiber (grams)
0.02
0.02
Net carbs
0.19
0.19
Sugar (grams)
0.18
0.18
Protein (grams)
0.10
0.10
Sodium (milligrams)
75.47
75.47
Cholesterol (grams)
3.85
3.85
This nutritional information is automatically pulled from a database and may not be correct. Please use the Nutrition Information on the products/brands that you use.
©2015 Southern Mom Loves. All rights reserved.
I'm all ready to roll my sushi!
Another tip: If your Nori feels stiff or crispy out of the package, keep a bowl of warm water beside you. Dip your fingers in the water to lightly wet down the Nori first. Otherwise, it will just crumble when you try to roll it up. But do it sparingly; You don't want soggy, torn Nori either.
So, using the SushiQuick, I...
- Place a sheet of Nori on the rolling mat and wet it down a little
- Add the frame on top of the rolling mat.
- Scoop a heaping paddle-ful of rice onto your sheet and spread gently. The frame keeps it neat while giving you a reference as to how high to pile your rice.
- Remove the frame and add your filling ingredients (above, I'm using avocado slices.)
- Starting at the end nearest you, pick up the rolling mat and start rolling and compressing your ingredients.
- Place the cutting guide over the sushi and cut eight even pieces. TIP: When you cut your sushi, turn your sink tap on and rinse the knife under water after each cut. Sushi rice is super-sticky, and this helps you get good cuts without tearing into the Nori with a knife blunted by rice.
- Plate and enjoy!
Avocado and cucumber sushi are the two easiest you can make. Let's try something a little bit more interesting.
Yield: 1

California Roll
Avocado and cucumber sushi are the two easiest you can make. Let's try something a little bit more interesting.
ingredients:
- ripe avocado, pitted and sliced into strips
- cucumber, peeled, seeded, and cut into strips
- a package of crab sticks, sliced in half lengthwise
instructions:
How to cook California Roll
- Roll up the avocado, cucumber, and crab sticks for a classic California Roll.
This nutritional information is automatically pulled from a database and may not be correct. Please use the Nutrition Information on the products/brands that you use.
©2015 Southern Mom Loves. All rights reserved.
Easy! Let's try an inside-out roll. You know the one: the rice is on the outside and the Nori is on the inside. It's not difficult! It just requires flipping over on a sheet of plastic wrap before you fill it.
Yield: 1

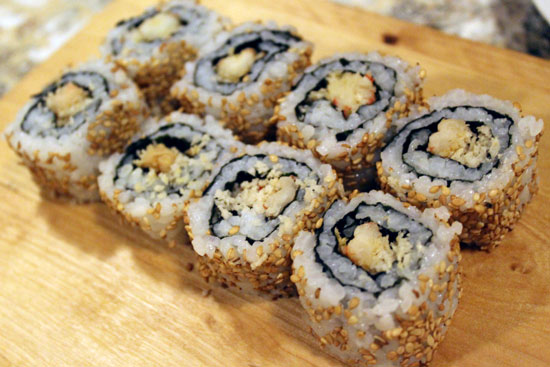
Crunchy Spicy Crawfish Inside-Out Roll
Let's try an inside-out roll. You know the one: the rice is on the outside and the Nori is on the inside. It's not difficult! It just requires flipping over on a sheet of plastic wrap before you fill it.
ingredients:
- Crawfish Tails, shelled and de-veined
- Panko breadcrumbs
- Spicy sushi mayo
- Optional: toasted Sesame seeds for rolling
instructions:
How to cook Crunchy Spicy Crawfish Inside-Out Roll
- Prepare your Nori with rice like a regular roll, then stop! Break out the plastic wrap!
- Place a sheet of plastic wrap over your Nori covered with rice.
- Flip the Nori and rice over on top of the plastic wrap.
- Place the sheet of plastic wrap back on the rolling mat, Nori-side-up.
- Fill with your crawfish tails and sprinkle liberally with Panko.
- Roll it up in the same way as above, taking care not to roll the plastic wrap into the sushi roll.
- Optional: sprinkle evenly with toasted sesame seeds and roll to coat. Then slice, add a zig-zag of your spicy mayo, and enjoy!
This nutritional information is automatically pulled from a database and may not be correct. Please use the Nutrition Information on the products/brands that you use.
©2015 Southern Mom Loves. All rights reserved.
Using the method above, prepare your Nori with rice, then stop! Break out the plastic wrap!
- Place a sheet of plastic wrap over your Nori covered with rice.
- Flip the Nori and rice over on top of the plastic wrap.
- Place the sheet of plastic wrap back on the rolling mat, Nori-side-up.
- Fill with your crawfish tails and sprinkle liberally with Panko.
- Roll it up in the same way as above, taking care not to roll the plastic wrap into the sushi roll.
- Optional: sprinkle evenly with toasted sesame seeds and roll to coat. Then slice, add a zig-zag of your spicy mayo, and enjoy!
My family loves this particular roll with or without sesame seeds and filled with crawfish, shrimp, or snow crab.
My son loves monster rolls. Did I mention he has a thing for eel? Well, I didn't have any eel for his, so I combined all of the ingredients on hand for a giant roll that I could barely close, and that he loved. So if you have them, add shrimp, crawfish, crab sticks, cucumber, avocado, and Panko together in large amounts, roll up, and zig zag with spicy mayo. Delish!
No, I didn't name it. (The Flaming Crustacean, perhaps? Revenge of the Claw?)
 |
| I never said I had zig-zagging skillz, y'all. |
We had a great time making (and eating) an amazing amount of sushi!
I loved using the SushiQuick kit for rolling. The mat was a hard, jointed plastic, so it rolls easily, and with even pressure. It would be hard getting a lopsided roll from it. The rice paddle was completely non-stick, so I didn't have any problems there, which is amazing considering how incredibly sticky sushi rice is; It also had nubs on the front and back to help you to spread the rice. The cutting guide is a must-have. There is no way I could have gotten even pieces without it.
Overall, it was a great kit, but if there is one thing I would improve, it would be to make the mat base run the entire width of the cutting mat. A tab on the underside of the mat fits into a slot on the base, so it wasn't wobbly, but it was a bit unstable if you put a lot of pressure on one side of the mat (*ahem, like when you forget to put the plastic back over the rice, and it gets stiff, and you have to strong-arm it to spread it over the Nori, ahem.*) Not a big deal though, and most people probably wouldn't even notice.
I hope this post was helpful and might encourage you to try making sushi at home! If you'd like to make it a bit easier on yourself, get a SushiQuick sushi making kit of your own. You can find them online here. It's a great buy at only $35 and it will make gorgeous, even rolls from the very first try, no practice required.
Thanks so much to SushiQuick for providing the sushi making kit I used in this post. You can also check out their social media for cool videos, tips (like which wine to serve with your sushi), and crazy-delicious sushi recipes.


0 comments